
Whimsical Penelope's Floral Slouch crochet pattern
I'm so ultra in love with this slouch hat. Not only is Whimsical Penelope's Floral Slouch spacious, but it is also light so it doesn't feel like it's pulling on you or weighing you down. Let's face it, looking good and loving what you wear is wonderful; but, comfort and style is what makes it perfect. It's light enough and covers well enough to work as the perfect chemo hat. Not to mention, you will love the soft texture and fit of this amazing hat. Try it! It's a Free slouch crochet pattern, but I've made the pdf available for your convenience.
Yarn – Red Heart Boutique worsted weight yarn (3.5 oz/280 yds): 1 skein Stained Glass
Materials – US Size J/10 (6.0mm) crochet hook, yarn needle, scissors
Difficulty – Intermediate
Size – One size fits most adults.
Stitch Guide
ch – chain
sl st – slip stitch
sc – single crochet
dc – double crochet
BBO – back bump only
bpdc – back post double crochet
Notes
Pattern is worked in rounds.
Pattern is worked from the top down.
Starting chains/turning chains count as stitches.
You will not turn your work.
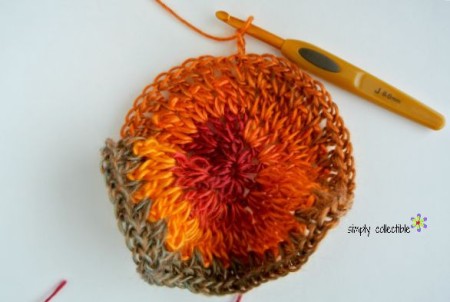
Throughout R3, you will notice your work getting wavy. It should. (See last image.)
Special Stitches
This is a v-stich variation of 2 double crochets worked between 2 double crochets.
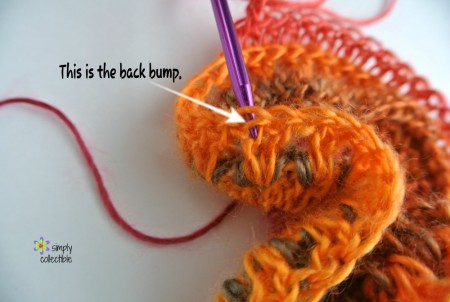
Back bump only means that you are working behind the stitch from the front so it pushed the stitch forward exposing the front loop and back loop. (The next image is taken from the back side of the work because I couldn’t get a better image for you. Do not turn your work; just reach back over the front and back loops.)
Instructions
Magic circle, ch 2
Round 1: 11 dc in the circle, draw the center closed, join w/ a sl st to top of 1st dc, do not turn. – 12 dc total
Round 2: Ch 2, 2 dc in first space (between the ch-2 and the dc of the previous row), 3 dc in each dc-space around 11 times, join w/ a sl st. – 36 dc total
Round 3: Ch 2, dc in the first space, 2 dc in each dc-space around. – 72 dc total
Round 4: Ch 2, dc in the first space, skip the next space, *2 dc in the next space, skip a space, repeat from * around, sl st into the top of the ch- 72 dc
NOTE: Round 5 is also worked into Round 3, but sits directly behind Round 4 and worked between the dc v-stitch of Round 4. The image below shows where you will stitch. The second image shows what it will look like. The third image shows how it will stack.
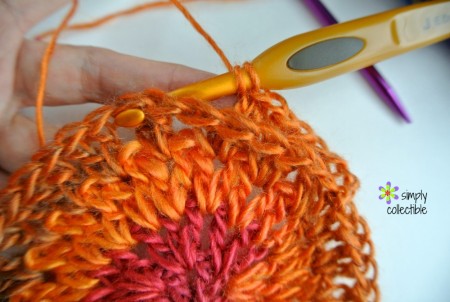
Round 5: Ch 2, pull round 4 forward, working into round 3, sl st between the 2 dc of round 4, ch2, dc in the same space, 2 dc between each 2 dc-space of round 4, sl st around the first chain – 72 dc
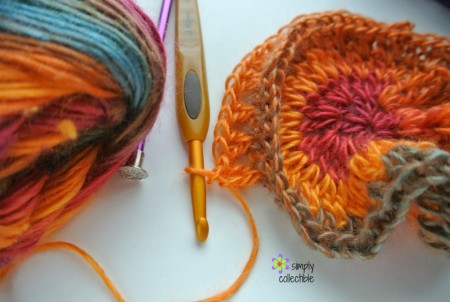
NOTE: As you can see, round 4 pops up/ stands on its own now.
Round 6 – 9: Ch 2, BBO dc 71 around, sl st around chain. – 72 dc
Round 10: Ch 2, bpdc 71 – 72 dc
Round 11 – 14: BBO dc 71 around, sl st around chain. – 72 dc
Round 15: Ch 2, bpdc 71 – 72 dc
16 – 19: BBO dc 71 around, sl st around chain. – 72 dc
20: Ch 2, bpdc 71 – 72 dc
21 – 27: BBO sc 71 – 72 sc
Finishing
Weave in the tails.
Miles R Steffen
Tuesday 20th of October 2020
Hey! I am loving this pattern. Can anyone help me out with round 4 going into round 5? I'm a little confused there.
Deb Pellegrin
Friday 30th of December 2016
Thank you for the wonderful pattern. On my fourth (4th!!!) hat!! Trying to upload pictures... Watch this space. ???? Deb
Celina
Wednesday 1st of February 2017
Thank you!
Diana
Friday 12th of February 2016
Fantastic! Love the colours, thank you.
Celina
Friday 12th of February 2016
My pleasure!
stitches'n'scraps
Tuesday 12th of January 2016
I love this! it looks so fun! thanks for sharing on my link party :)
Celina
Thursday 28th of January 2016
It was my pleasure!
Crochet Hooks
Wednesday 6th of January 2016
love the yarn, love the hat! Thanks for the pattern! One of the newborns in need ladies we hang with collects hats for ped cancer patients, I will have to share this with her!
Celina
Tuesday 12th of January 2016
That is lovely! Thanks so much.