
Sun Hat Free crochet pattern
Keep cool and stay in the shade with Coraline's Sun Hat. This free crochet hat pattern makes a lovely sun hat from sizes from Infant to Adult shading their nose and eyes from the rays of the sun. This baby hat crochet pattern perfectly matches my Sturdiest Ever Market Bag. Click HERE to see the market bag.

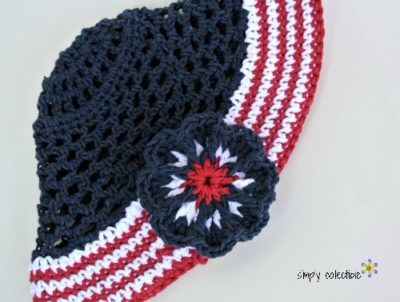
Click HERE for the flower embellishment
Click the links to purchase supplies.
Yarn
2.5 oz Sugar n Cream Cotton or other worsted weight cotton
Materials
K (6.5mm) hook
Yarn Needle
Stitch Markers
Scissors
Difficulty – Easy
Size – Newborn, 6mos-9mos, Toddler
Measurements in Pattern
14” circumference (newborn), 16” circumference (6-9mos), 18” circumference (Toddler)
Gauge – Not crucial for this project
Stitch Guide in American Terms
ch- chain
sl st- slip stitch
xs- times
sk- skip
alt- alternate
fl- front loop
bl- back loop
sc- single crochet
hdc- half double crochet
dc- double crochet
inc – increase (2 of the stitch worked into the same stitch)
ea- each
st- stitch
sts- stitches
sp- space
Special Stitches
How to decrease stitch (abbreviation is “dec”): This is otherwise known as “sc2tog” and here are those instructions. Insert hook into st and draw up a loop. Insert hook into next st and draw up a loop. Yarn over, draw through all 3 loops on hook. That is one decrease.
Notes
Beginning stitches count as a stitch throughout this pattern.
Instructions
Newborn:
R1: Ch3, join into a loop, sc7, do not join — 7sts
R2: Ch3, dc in next, dc inc around, sl st into top of ch –14sts
R3: Ch3, dc inc (dcbl, dcfl), *dc, dc inc; repeat from * around alternating each stitch between bl and fl, sl st into top of chain — 21sts
R4: Ch4, *dc, ch1; repeat from * around, sl st into 3rd ch of starting ch — 21 sts
R5: Ch2, hdc in 1st, hdc inc around, sl st into top of chain — 42sts
R6: Ch3, sk1, *hdc, ch1, sk1; repeat from * around, sl st into 2nd ch of starting ch — 21sts
R7-8: Sc, ch2, *hdc in sp after hdc, ch2; repeat from * around, sl st into top of sc in starting ch — 21sts
R9: *Ch2, sc in next loop; repeat from around, sc into 2nd ch of starting ch — 22sts
R10: Ch2, sc in same as starting ch, sc inc ea st around — 44sts
R11: Working between the 2 stitches in the previous row, sc inc around — 88sts
R12-15: Sc around — 88sts
To end: Sk1, sl st and fasten off. Weave in ends.
6mos- 9mos:
R1: Ch4, join into a loop, sc8, do not join — 8sts
R2: Ch3, dc in next, dc inc around, sl st into top of ch — 16sts
R3: Ch3, dc inc (dcbl, dcfl), *dc, dc inc; repeat from * around alternating each stitch between bl and fl, sl st into top of chain — 24sts
R4: Ch4, *dc, ch1; repeat from * around, sl st into 3rd ch of starting ch — 24sts
R5: Ch2, hdc in 1st, hdc inc around, sl st into top of chain — 48sts
R6: Ch3, sk1, *hdc, ch1, sk1; repeat from * around, sl st into 2nd ch of starting ch –24sts
R7-8: Sc, ch2, *hdc in sp after hdc, ch2 ; repeat from * around, sl st into top of sc in starting ch — 24sts
R9: Sc, *ch3, sc in sp after hdc; repeat from * around, ch3, sc around beginning ch3 — 24 loops
Continue by working in a spiral- do not slip stitch. Use your stitch marker.
R10-11: *Ch3, sc into loop; work from * around, ch3, sc around beginning ch3 — 24sts, 24 loops
R12: *Ch3, sc into loop; repeat from around — 24sts, 24 loops
R13: *Ch1, sc in next loop; repeat from around — 24sts
R14: Sc inc around — 50sts
R15: Working between the 2 stitches in the previous row, sc inc around — 100sts
R16-22: Sc around — 100sts
To end: Sk1, sl st and fasten off. Weave in ends.
Toddler:
R1: Ch4, join into a loop, sc8, do not join — 8sts
R2: Ch3, dc in next, dc inc around, sl st into top of ch — 16sts
R3: Ch3, dc inc (dcbl, dcfl), *dc, dc inc; repeat from * around alternating each stitch between bl and fl, sl st into top of chain — 24sts
R4: Ch4, *dc, ch1; repeat from * around, sts sl st into 3rd ch of starting ch — 24
R5: Ch2, hdc in 1st, hdc inc around, sl st into top of chain — 48sts
R6: Ch3, sk1, *hdc, ch1, sk1; repeat from * around, sl st into 2nd ch of starting ch — 24sts
R7-8: Sc, ch2, *hdc in sp after hdc, ch2 ; repeat from * around, sl st into top of sc in starting ch — 24sts
R9: Sc, *ch3, sc in sp after hdc; repeat from * around, ch3 and sc around beginning ch3 — 24 loops
Continue by working in a spiral- do not slip stitch. Use your stitch marker.
R10-11: *Ch3, sc into loop; repeat from * around, ch3, sc around beginning ch3 — 24sts, 24 loops
R12: *Ch3, sc into loop; repeat from * around — 24sts, 24 loops
R13: *Ch2, sc into loop, ch1, sc in next loop; repeat from * around — 24sts
R14: *Ch1, sc inc in next 2; repeat from * around, sc inc in last (4sc over 2 spaces) — 50sts
R15: Working between the 2 stitches in the previous row, sc inc around –100sts
R16-22: Sc around — 100sts
To end: Sk1, sl st and fasten off. Weave in ends.
If you enjoyed this free baby hat crochet patterns, stop by my fantastic new curated pattern blog post of 60+ Simple Baby Hat Crochet Patterns, 40 Free Newborn Crochet Hat Patterns
bethany
Wednesday 6th of July 2016
So cute!!! This would be perfect for my 18 mo!
Celina
Thursday 21st of July 2016
So sweet, Bethany! Thanks for coming by.
Leta Carr
Friday 24th of June 2016
Your instructions are not clear. I had to backtrack several times to make sure I understood. I have read many patterns in my time and this one is not well written. Sorry.
Celina
Friday 24th of June 2016
I am so sorry you had trouble. I sold hundreds of copies after 5 testers and a tech writer reviewed it and this is the first time I am hearing this. Good luck!
Kathy
Tuesday 2nd of June 2015
Hi! I love this pattern! But I have a question about the dc increase. Does the instruction "dc inc (dcbl, dcfl)" mean increase by working a dc in the back loop and then the front loop of the same stitch?
Thanks, Kathy
celinalane
Tuesday 2nd of June 2015
Yes, Kathy. That is correct. :)
Colie Bee-Charmer Van Blaricum
Wednesday 22nd of April 2015
Quick question, how did you get the brim to wave like that? Mine won't quite do that...did you get it wet and shape it? Thanks!
celinalane
Thursday 23rd of April 2015
I need to apologize. The was trouble transferring the file and the brim is a typo. Looking to rectify this immediately.
Colie Bee-Charmer Van Blaricum
Wednesday 22nd of April 2015
I loved making this sun hat! It was quick and easy, and super lightweight. I can't wait to use it on my son :)
celinalane
Thursday 23rd of April 2015
Thank you!