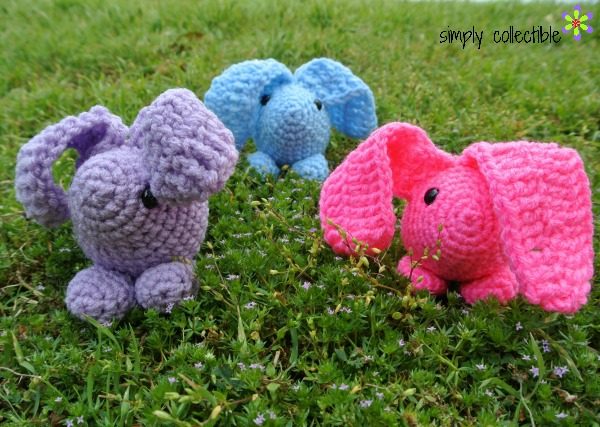
Baby Bunny Amigurumi
Super easy and quick this Baby Bunny Amigurumi crochet pattern will bring a taste of spring to any season. As spring really begins (at the time of this post), everyone is looking forward to wildflowers, baby birds, sunshine and light showers; but to me, nothing says spring more than Easter. Easter is my personal new year which I greet with fasting, meditation and prayer. There are so many things related to spring, though! Flip-flops, bluebonnets, campfires, sprouts, blossoms and bunnies are just a few. I had the opportunity to care for about 10 bunnies 3 years ago. Needless to say, they provided great fertilizer for my garden. In honor of bunny lovers everywhere, I present to you my Baby Bunny amigurumi crochet pattern. One of these cuties is the size of a tennis ball and works up in about 45 minutes. That's my guess anyway. With so many interruptions around here, I can never really tell. (I say that lovingly.)
Materials:
Red Heart Super Saver – 1oz.
G-hook/ 4.00mm
Stitch Marker
Polyfill or Scrap Yarn to fill
8mm amigurumi eyes
Scissors
Yarn needle
Abbreviations:
sc- single crochet
ftr- foundation triple (treble) crochet
tr- triple (treble) crochet
st- stitch
sts- stitches
dec- decrease (same as 2tog / 2 sts completed together to form one st- explanation to follow)
* * – anything between the asterisks is a sequence that is repeated.
Click HERE to purchase the pdf
Body:
R1: Chain 2, 6 sc in 2nd chain from hook
R2: 2 sc in each st around (12 sts)
R3: * Sc, 2 sc in the next st * (repeat from * to *- 18 sts)
R4-5: Sc 18 (18 sts)
R6: * Sc 2, 2 sc in the next st * (repeat from * to *- 24 sts)
R7: * Sc 3, 2 sc in the next st * (repeat from * to *- 30 sts)
R8-14: Sc 30 (30 sts)
R15: Dec 8 around (will be the top of his backside), sc 14
R16: Sc 22 (22 sts)
Add eyes between rows 4&5 or 5&6, about 7-8 stitches apart. Sew ears onto R8, stuff as you go.
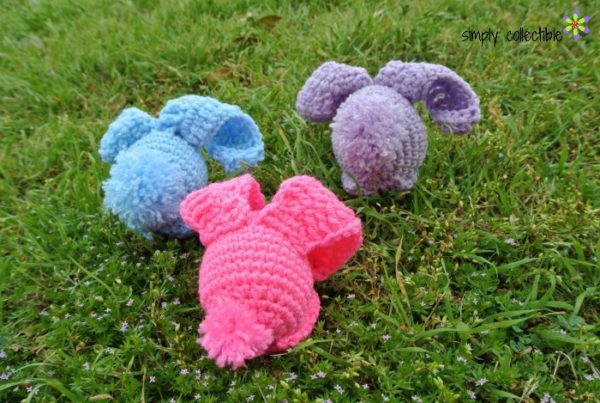
R17: Dec 12 around, sew closed, sew in the tail, add pompom for the tail. To make the pompom, I wrap the same color yarn around 3 fingers about 25 times and tie off in the center, followed by cutting through all the loops. Then trim it into a clean shape that you desire.
Hind Feet:
R1: Chain 2, 6 sc in 2nd chain from hook
R2: 2 sc in each st around (12 sts)
R3-5: Sc 12 (12 sts)
R6: * Sc 4, dec * (10 sts)
Do not stuff.
R7-9: Sc 10 (10 sts)
R10: * Sc 3, dec *, slip st, fasten off leaving a long tail to sew, sew onto body to hold bunny up.
For an comprehensive pompom tutorial, I like Stitch 11's found at: http://stitch11.com/secure-pom-pom-tutorial/

For the ears, there are two options to start in the case you have not worked a foundation triple (treble) crochet. To stiffen the ears, I crocheted over the tail. Starting with an 8″ tail was ideal for me, but with an even longer tail and you can crochet over it on both sides. Body and feet are worked in a continuous round.
Ears:
First option to start: Starting with ch2, ftr15
Second option to start (alternative): ch16, starting in 2nd ch from hook tr15 add 3tr in last ch (4 total in last ch, total 18sts), continue working around the opposite side, tr14, hdc in chain (15sts- 34sts, including beg ch), fasten off leaving a long tail to sew.
Sew onto R8 on bunny's head. Enjoy!
Looking for more great crochet patterns: 30+ Amigurumi Crochet Patterns: Cute and Easy Projects for Beginners, 30+ Dinosaur Crochet Patterns
Rolene
Tuesday 11th of October 2022
Hi. Cute bunny. I just read the pattern, but cant understand rd 15 on the body. Dec 8 around, sc 14. Do you have to decrease 8 stitches next to each other or what?
Tina
Saturday 15th of April 2017
These are SO cute. I wish I would have found them sooner rather than the day before Easter. Where do you find the 8mm amigurumi eyes?
Celina
Tuesday 18th of April 2017
Thank you! I understand, Tina. You'll be ready for next year! I found the eyes at Hobby Lobby, but there are some sellers on Etsy as well.
Celina
Tuesday 1st of March 2016
Thank you for the feature, CrochetForYouBlog!
brigarkee
Thursday 2nd of April 2015
I love this pattern =) Too cute! I would post it in my community, but I have to wait because I made these as a gift for my daughter and she is a member!! She'll get them tomorrow so I'll send you a pic then =D I had fun, made 3... Couldn't stop! Thanks Celina!
celinalane
Thursday 9th of April 2015
Oh, that's great! I completely understand having to keep it on the down-low.
Claudia Pike
Thursday 19th of March 2015
How do I email pics to you?
celinalane
Friday 20th of March 2015
Hi, Claudia ~ My email is that little envelope in the top left of my site and you'll see a Submit page in the menu bar. Thank you for asking!